Loving my hennaed hair

Biggest response I got from comments after my post about my first try at hennaing my hair was "sounds complicated" or "too much work." As my daughter said, "It's more like baking fresh bread- takes a long time between start and finish but not all that much actual work involved." And like homemade bread- results are worth the wait time and little work that it actually takes. 


While working on yesterday's post I did a henna gloss to oomph up the red tone in my hair after old highlights/grays were slightly green cast after henna & indigo. This was super easy- I had mixed the henna (more lawsone content) the night before and let rest overnight for dye release. I grab the baggy of henna paste and added about 3/4 cup of (cheap- Suave) conditioner and about the same amount of henna paste. Slathered this on my hair with gloved hands, popped a cheap disposable shower cap on top with a bit of paper towel under the elastic to prevent drips, and wrote my blog while waiting a bit. A half hour later I rinsed well (easier to rinse gloss out than henna/indigo pastes) and eagerly looked to the mirror for the results-- PERFECTION!! The perfect brown with auburn slant that I was looking for but with bonus of thicker, silkier, stronger, shinier hair. My hair was really thin- more like invisible thread whereas I'd say now they are nearly double the size. 


Henna doesn't have to be as "complicated" as my first time. My problem was my starting color was complicated- my typical color routine was to dye my hair some sort of ash brown and then do highlights to blend grays and I always hated the way boxed dyes made my hair way too mono-chromatic... no matter how much they said "dimensional" they left it pretty much the same color all over which in my opinion is NOT natural on medium brown hair. The other reason my henna session was complicated is that with my skin tone, I had to be very picky about balancing the color- it could be auburn but not copper/orange with my olive tan skin color. 


So if your hair color is close to normal- the recipe for success doesn't take 3 attempts like it did me. If you can take more red toned hair- then just the henna session would have worked on you. If you had darker hair (no highlights) the henna session would have just provided you with lovely red highlights in the sun. If you had black hair to start with, you could have achieved lovely black hair by following freshly hennaed hair with indigo only- indigo doesn't take well to hair without a henna session first. Most of the video tutorials I found on henna/indigo were on African American hair- so that tells you something about the beneficial effects of using henna & indigo. For those wanting just to oomph color- a gloss like my 3rd session would have been perfect. Really not much more time than a box hair color other than the preparing the henna the night before. Plus the next time you want to gloss your hair all you have to do is thaw out the leftover paste. 


I will never go back to commercial dyes- my hair feels way too amazing and the color is totally me. Plus I know I can hide the grays easily with a glaze whenever I need to- no more need to wait to give my hair a rest between dying (drying) like before. After this first venture I have learned so much already- I only need a little indigo to tone down the red. I've even learned that the higher lawsone content in my henna is actually better than the weaker ones. My hair can take the red but the weaker ones tend to take it to orange which doesn't look right on me. I think from here on out, it's more maintenance glosses (30 minute sessions) rather than full on henna day- the total time I had henna/indigo/henna gloss on my hair was 2 hours/1 hour/30 minutes. Less than a typical henna session due to my hair being thin and taking up color easily. I can't stop stroking my hair since my henna sessions-- it's really that silky soft. I also notice another big change after henna- I used to shed like mad-- enough so that it kind of grossed out MIL when I would visit because my dark hair would show up on the pillows/bedding. I haven't found a stray hair since. I find this amazing because can't tell you how many times I'd be searching my shirt for a hair that was tickling my arm- I see this interpretive dance becoming less daily-- my brush (which was cleaned out to do strand test) had about 5 hairs in it since hennaing. That's a major deal to me. Plus you can henna your brows to make match your hair-- anyone that's ever gone red knows how wrong brown brows look with red hair-- but if you do with commercial dyes you could lose your eyesight. 


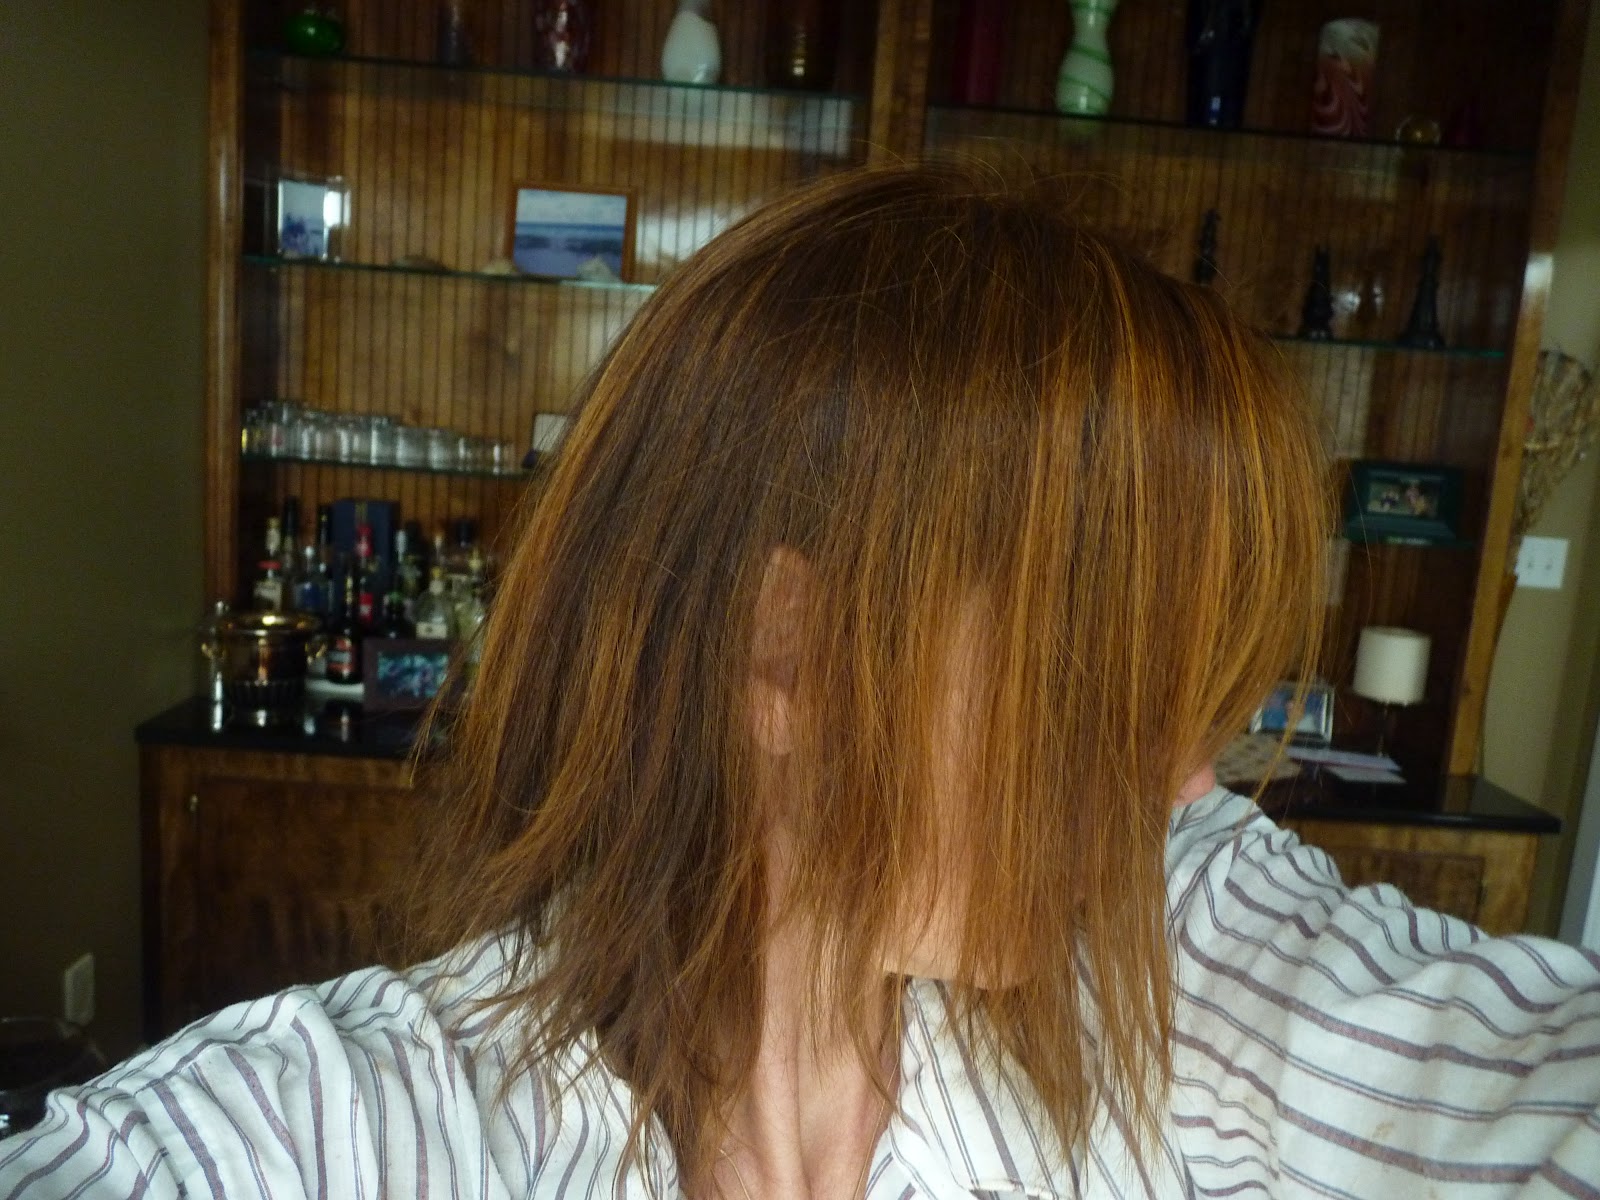
I leave you with these shots taken yesterday after doing the 3rd henna only gloss of 30 minutes. 
3rd time's the charm- after 30 minute henna gloss

Not too orange, not too green- brown with red flare and look at the shine- never got that with box dyes

Love the dimension the henna process has given my hair. This is what I've always been trying to achieve with traditional dyes. 


Henna Happenings with Hoozey.

Howdy all. Long time, no blog. Sorry about that but "RL" got in the way- as in real life. I have been super busy which I will fill you in on in another blog but today's venture into henna hair color demanded a blog.

Silly me did not take a before photo. I meant to but in eagerness to try henna for the first time I forgot until it was too late. So I'll try to describe my before hair color- the bottom and back of my hair were intentionally darker- like a medium slightly ashy brown. The front and top were highlighted to make the gray blend in better as they grew in.

What drew me to henna was my daughter reading up on it because she has always craved auburn hair. She's been dying her hair with the demi-permanent hair colors for about 2 years and considers herself a redhead- that's what she feels is her true color- rather than the mousy brown she naturally has. She worried about the damage she may be doing to her hair by dying it and the roots always show up extremely green looking against the auburn so it only looked good at the very beginning. Plus everyone knows that red is the hardest color to keep from fading. She said that it actually makes your hair healthier. I worried about doing henna and it not working out right and never being able to go back to commercial dyes- you know how many say not to use on henna hair. That is actually a misconception on henna. You can go back IF you get 100% pure body art grade henna- it's those "hennas" that have metallic salts in them that are the bad ones.

So I started researching henna myself. First thing I learned henna is only red toned. All the henna kits that say brown or black colors are not just henna. That's not to say that you can't get brown or black hair using henna and other natural herbal hair dyes. Second I learned that henna will not lighten your hair- it will coat it with red pigment- so the color you end up with depends on the color of your hair to begin with. White hair dyed with henna will be vibrant red but dark hair will only have some red highlights in the sunshine.

Henna can strengthen, condition and thicken hair. It is also known to loosen curl pattern so frizzy hair can be tamed a bit by henna. It gives lots of shine since it only adds color without stripping hair like commercial dyes do.

Other herbs like Cassia Obovata (neutral henna) will add golden tones and shine. Indigo can be added to your henna regime to get brown and black results. There is also a long list of herbs for hair but I will focus on those for coloring hair naturally in this post.

I ordered body quality henna from Henna Sooq per Michelle's recommendation. I ordered almost every "color" of henna since daughter wanted red and I wanted browner results. The difference in these hennas is only in the amount of lawsone (dye henna contains) in the plant. The more lawsone in the henna the more intense red the results will be. I also ordered amla, indigo, bhringraj, bhrami and shikakai--some to make henna more brown, others just for their herbal haircare benefits. I'll blog about these as I use them but I was definitely interested since my hair has been described as "a forest of skinny trees" meaning I have a lot of hairs but they are baby fine- so my hair can use some fattening up.

The downside of henna is the time commitment- unlike commercial dyes- henna needs to be mixed in advance for dye release (about 12 hours) and then needs to be on one's hair for much longer than the typical 30 minutes (now some even only 10 minutes) of box dyes. It is also a learning curve to achieve the color you want and henna is permanent. The upside is that one is left with healthier hair and you don't have to wait for your hair to recover from coloring.

So I mixed 100g of the henna with the least amount of lawsone with ACV and strong coffee to make it the consistency of pudding the night before doing strand test- hair from my brush. I let this sit overnight for dye release. I also mixed 2 different 100g packages of henna with higher lawsone content for DD's use- she has thick, slightly longer hair so I knew she'd need more than one package since she needs 2 packages of traditional dye to get all her hair. I mixed these with lemon juice (bottled kind) and water until I got the pudding consistency and let it sit overnight. The next day I added a tiny bit of amla to my mix for one trial and just the henna mix on the other for my strand tests. I added a little paprika (for redder results) to one of DD's strand tests. Left these mixtures on the strands for about 4 hours (wrapped in plastic wrap.) Upon rinsing all the strand tests were definitely red-toned and no noticeable difference between the amla/paprika additions. I wore gloves for this- henna stains hands easily-- drier areas take the dye better than moisturized areas so I did apply moisturizer to my hairline to help prevent staining.


I placed the henna mixtures in the freezer for storage. Monday morning I got the mixtures out and placed in hot water to thaw while I mixed up about 3 tablespoons of amla with strong tea and instant coffee. I also mixed a whole jar of inexpensive paprika with hot water for DD's henna. I mixed the amla and henna together and placed in a carrot bag-- cake decorating plastic bag. I woke DD to help pipe the mixture onto my head. As predicted my hair was coated with less than the full mixture- I had about 1/3 left after application. We wrapped my head in plastic wrap then I topped with a cheap plastic shower cap and wrapped with a pre made wrap I found in the ethnic hair area of Walmart. Then I mixed paprika in DD's mix and applied to her head-- took the whole amount. We placed a little of the henna mixture on her eyebrows- one of the perks about henna is that it's safe to dye brows the same color. We wrapped her head in the same manner and put two small pieces of plastic wrap over her brows to keep the mixture wet. She then proceeded to go back to bed (she had worked at Steak N Shake the night before.) After 2 hours I checked a small piece of my hair and found that the henna definitely took. So I started rinsing it out of my hair. Most of the places recommended using an inexpensive conditioner to help rinse the muddy paste out so I did that. I rinsed many times this way- using about 1/3 of a big bottle of conditioner. After I felt like my hair was pretty clean, I packed on some heavy duty conditioner and placed a cheap shower cap over it to deep condition about 1/2 hour. Eventually DD woke and we rinsed her hair out after about 4 hours with the henna on it. During this time, my hair had dried naturally and I found it too red/orange for my liking so I thawed the leftover henna and mixed about 35g of indigo with hot water and let it rest for about 20 minutes for dye release. I then mixed the two together and applied to my hair, wrapped in plastic wrap & shower cap and waited about an hour. I repeated the rinsing process this time with another Suave conditioner (Coconut) which I found was actually a little better for getting the henna mixture out quicker. The results were much closer to my natural hair color although the highlights were ever so slightly green tinged from the indigo. Indigo is a can't go back choice because lightening it will produce frog butt green. Henna can be lightened. I was OK with the results with this second hendigo application-- I may do a henna gloss (henna mixture mixed with conditioner) to redden it up slightly. In the future I will probably opt for redder henna mixed with less indigo-- I'm OK with red tones to my hair but not ORANGE. I don't blame henna but more about all the stuff done to my hair before that made getting things right a little more challenging. I needed to get my hair darker all over with indigo addition but think in future doing just henna could look fine the next time around.
Henna only application-- too orange 
Highlights too orange with henna only.
After application of henna & indigo. Took down the orange
After Henna & Indigo- Indigo made it ashy/greenish but more natural than the orange

Henna Only- too orange in the previous highlights/grays